Saturday, April 25, 2015

Front Drum Inspection and Removal (part 2)

PROGRESS AT LAST


You may recall for part 1 that I was having trouble getting the pulley off.

A friend was over today and asked what state the roller was in.

He got out his tools and scratched in the hole to clean up so he could get is allen key in.   The allen screw came out easy.


Next he drove 3 1/4 inch bolts into the 3 holes in face of 177 which pushed it out of the pulley.

It was not quite that clean as one of the bolts twisted off.  But it is sticking out the other side and may come out with a vice grip.


Friday, January 17, 2014

Pictures of My Roller from 2011

We first saw this roller 2 years earlier at the city auction but did not bid on it.  Luckily no one else did either.  It was still in this exact spot when we bid on it in 2013.    Looking at these pictures reminds me how much work it took to just move it.  The drive chain was rusted solid and buried in the ground.


Saturday, January 11, 2014

Front Drum Inspection and Removal (part 1)

I bit the bullet and started on the front drum.


The right side came off without too much problem using my air impact.

The flex mount to the right is bonded to the plat and the bushing it its center.    From what I can see the mount on the other side has let loose of the plate.


The other side did not go nearly so well. The photo to the left shows the bolt I ground down because the head was stripped.


I do not understand how this pulley is supposed to come off.


<missing image from the manual>

I have removed 3 bolts from the face.  There is a hole on the top that could well be for a set screw but so far repeated cleaning with pbBlaster has not revealed anything that an allen will go into.     It turns out that the pulley on this machine is the style used on post 72 machines shown here.  The diagram is rather poor.  It does not show the 3 bolts I removed from the face although it does show that slot in the bushing opposite the keyway.


Jan 12

The slot in the bushing tells me that if collapes a bit when forced into the pulley to make a tight.  If that is the case a few blows with a chisel between the hub and pulley should knock it loose but it did not.  There must be an allen screw locking it down from the top in the picture above.


.

Friday, January 3, 2014

Flex Mounts

In preparation to pulling the front drum off I am doing some research.   According to the manual they used the rubber flex mounts on the front axle from 1966 to 1974

 With Flex Mounts


Without Flex Mounts

Part 104 (EDIT: Think its 105) is the flex mount.  The 2nd image shows the post 1974 version without the flex mount.

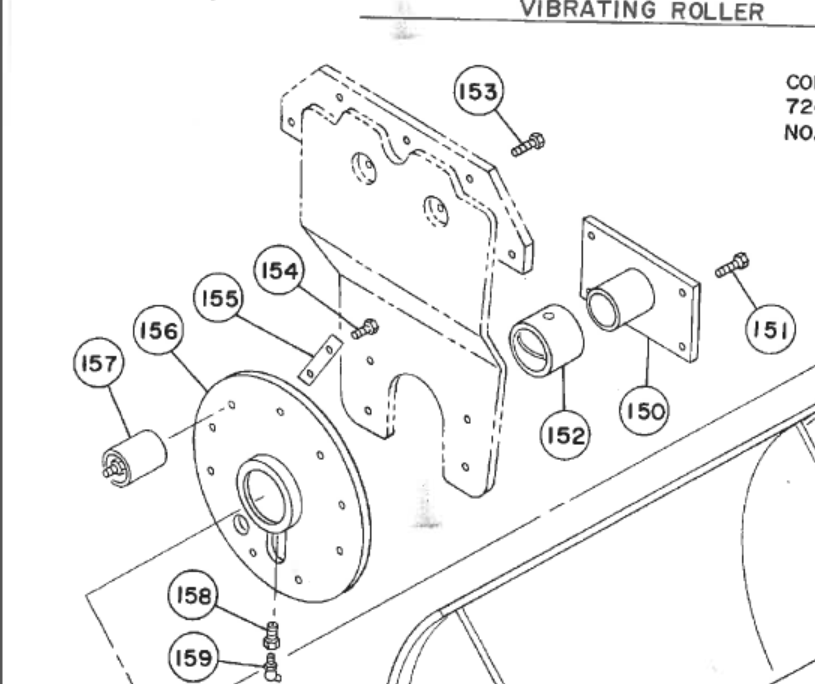
My thinking is that I can make laminated wood bushing to replace the rubber if needed.  If that does not work it may be possible to have the welding shop make up parts similar to 150 in the 2nd image to eliminate the flex mounts.  The axle aka the vibrator shaft has different part numbers for the two arrangements so I doubt one could do a bolt on replacement without swapping out the front drum.


Saturday, December 28, 2013

Fears have been realized.

I managed to attach the brake rod yesterday.   The rod end goes through a hole in a lever attached to the brake band. This has always been difficult to put in and with everything else in place it became impossible.   The rod had a flat spot where it had been rubbing against a frame member.  I used the hydraulic press to put a bow in the rod which fixed the clearance problem.  The rod has been on and off the brake so often that I have tired of fishing cotter keys into place and bending them.  Removing them is even worse.  Instead I used a hitch pin clip.


The more I work on this the more I am convinced that the brake was not right to start with.

Unfortunately the sprockets on the drum does not line up with the rest.  I towed the roller from the shop across the street hoping that the drum might shift back to its correct position.  It did not.  I may have to remove the drum to sort it all out.


Thursday, December 26, 2013

Progress on the Brake and Something New.

The last time I worked on the roller I put the front end on jack stands.  Today I noticed that the belt that drives the eccentric for vibration was tight when it should have not been.   It seems the front drum is set in rubber to help isolate the roller from the vibrations.  The rubber stretched.  I do not know how much damage this did.  The part with the rubber is 105 "Flex Mount with Bushing".  Between this and the snubers I wonder if this unit will ever vibrate again.  Live and learn.  Still looking at the diagram I do not understand how this could happen.  I was too focused on the brake today.  I need to investigate this further.


<missing image. see manual>

The key to reassembling the brake band setup with everything removed but the band (264) and rotate it so the ends of the band are at the bottom of the drum where they are exposed.  The add all the parts but the actuator rod from the pedal (274).   Then the band can be rotated into position and the rear (276), then front (282) supporting blocks attached.  Note that supporting block (276) goes between springs (277) and (278).  The end of the band goes below the bottom spring (277).  I put one shim each on the front and back support blocks.   The original shims are shown to be .062 inches in the manual.  These seem much thicker.
<missing image. see manual>

I still need to attach (273) and (272) and find a stronger spring to replace or supplement the spring return on the brake.  The locking lever (266) needs a spring too.   The existing brake return spring maybe strong enough to work on the locking lever.   

When the brake is finished  I can start putting the chain and its tensioners back on unless there is real damage to the front from jacking.  

The new chain has arrived from Amazon.  It was one of their scratch and dent items which they marked down to about 1/3 of the original price.  Like that :)  But the chain will not do much good until we order a chain breaker and some master links.

Sunday, December 22, 2013

Tooled around in the VR30RE for 15 minutes

The ANLED serial number is 5509995.  A search of the wisconsin engine database returns

Serial Number Found!
Produced Year: 1975
Produced Month: April
Engine Model: N/A

The first digit of the serial number for the roller is simply not legible.   It is ?2092610,   That tells us the roller was made in a year ending with 0.  The first ones were produced in 62 so that would leave 70.  However this does not agree with the motor but it could have been replace somewhere along the line.

A few days ago I put the drive chain on and drove the roller for about 20 minutes.  It was working well till something failed on the drive side of the main roller and stopped the drum from turning.  This happened in front of the shop behind the dumpster.


In the process it broke the chain, messed up the band brake, and ruined at least one of the rubber snubbing roller.  I removed the snubbing rollers by grinding off what remained of the two attachment bolts.


Two bolts holding the brake band in place were missing.   I do not know if I had inadvertently removed these when I rescued the roller from the city lot or if they were already gone.   The holes were blown full of dirt but there is a chance that could have blown in since then.   There seems to be no permant damage to the brake setup.   When I get done it should be fully functional for the first time.  The real loss is the ruined rubber snubber roller or rollers.  But asphalt had been allowed to build up on the rim of the drum where they rid and they may have already been useless.  Replacements are going to be hard to find.  Maybe hard rubber rollers used on boat trailers could be repurposed.

The brake mounting like the drum flange had a buildup of asphalt forcing the band to the outside.  In an effort to remedy this some mechanic had moved a shim from the rear brake mount to the front which may have caused it to bind even more.  Putting the brake together has been a bit difficult.  The right choice may be to hook everything up then put in the 4 band mounting bolts.

That was all a few days ago when the weather nice with 60s and 70s.  The last few days it has hardly been above freezing.

Today while working on the spare motor I found a starter rope so I hoofed it over to the other shop to see if the roller would pull start.  It took about 4 pulls but it was cold outside and I expect the motor was even colder.


I also opened up the carb for the 2nd ANELD.    It has been through the ultrasonic cleaner a few times but has a ways to go.